
Estimated reading time: 2 minutes
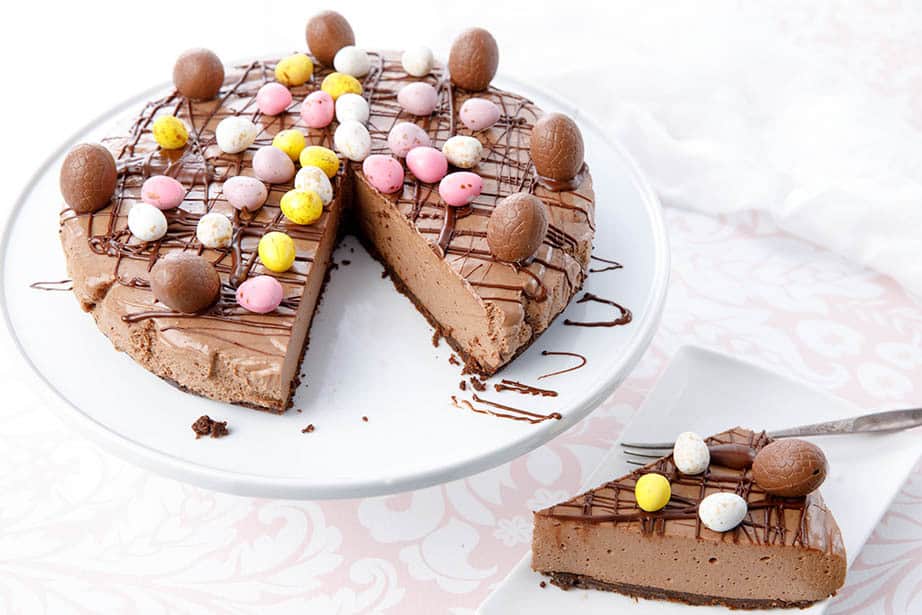
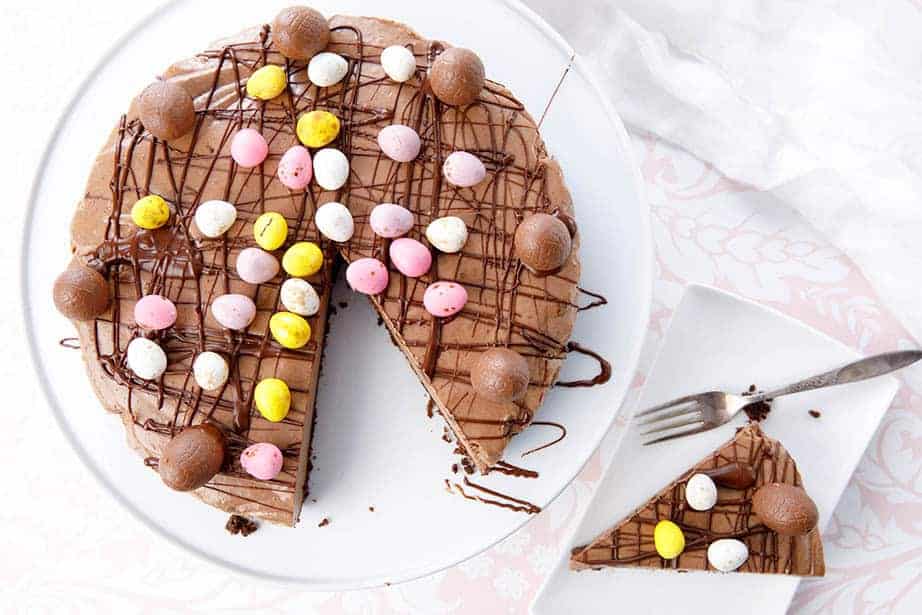
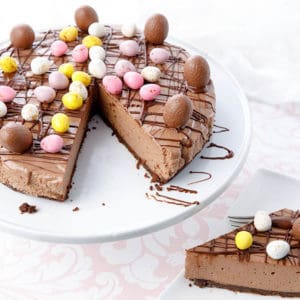
This Thermomix "no bake" chocolate cheesecake perfect for Easter. It's super silky and deliciously chocolatey. The cream cheese gives that expected tangy "cheesecake" flavour that will have you in raptures.
Key Takeaways
- This Chocolate Cheesecake is a silky, no-bake dessert featuring a delightful cream cheese tang.
- Decorate with Easter Eggs for a festive touch, using mini candy eggs and caramel-filled chocolate eggs.
- Allow at least 6 hours for the cheesecake to set; prepare it the day before serving for best results.
- Use dark chocolate to balance sweetness and heat it in 30-second intervals to avoid seizing.
- For variations, try adding Kahlua or Tia Maria for a Jamaican twist, or opt for a quick Salted Caramel Cheesecake if short on time.
Table of contents
On our facebook group page, a few people have been asking for an Easter recipe. My favourite dessert has always been cheesecake, especially chocolate cheesecake so it seemed like a good excuse to share my favourite "no bake" chocolate cheesecake recipe with readers.
To add a little Easter spirit to the dessert I've decorated the cheesecake with a selection of Easter Eggs. I have used some cute little candy mini eggs for colour and the larger chocolate mini eggs are filled with caramel. Naturally caramel, because I love caramel!
Chocolate Cheesecake Watchpoints
- Setting time - The cake will require at least 6 hours to fully set. This is a dish which is best prepared the day before serving.
- Dark chocolate is preferable to milk chocolate as it will prevent the cheesecake from being too sweet.
- When microwaving the chocolate, heat in 30-second intervals to prevent overcooking and a seized chocolate.
- Ensure there are no lumps in the gelatine before adding it to the cheesecake mixture.
- The maximum sized springform tin is 9". If you don't have a 9" diameter tin use a smaller size. (not larger).
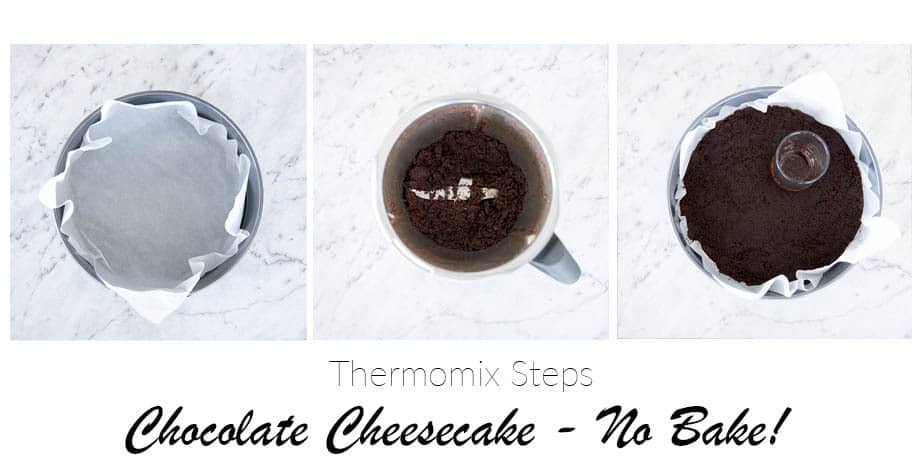
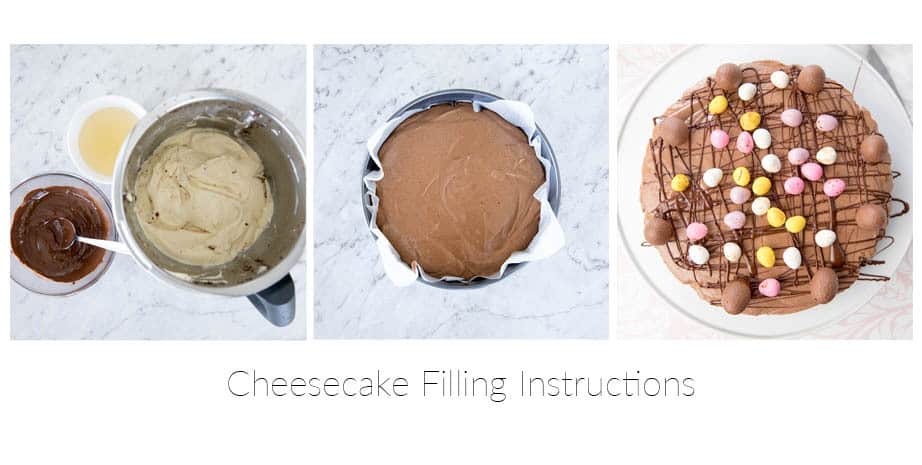
Below you can see some process shots which will give you a better idea of how the dish should look at each stage of the recipe.
Chocolate Cheesecake Steps
Other Related Recipes
Jamaican Chocolate Cheesecake Variation
Have you ever tried the Cheesecake Shops Jamaican Chocolate Cheesecake? It's my absolute favourite! If you add 40mls of either Kaluha or Tia Maria to my recipe, this cheesecake tastes remarkably similar.
If you're short on time and want to serve a cheesecake please try my Salted Caramel Cheesecake. It's another quick to make, "no-bake" cheesecake, however, this cheesecake is served individually in glasses, because it doesn't require the same setting time as a regular cheesecake.
FAQ Easter Chocolate Cheesecake
Store the cheesecake in an airtight container in the fridge for up to five days.
Yes, you can make the cheesecake the day before and the decorate it on the day. Store it in the fridge in an airtight container.
Let's Connect!
I share loads of great recipes on the website, but I also have a lively social community. Take a look at the Facebook Group page. It is a fabulous place to ask questions, join the chatter, and share images of recipes you have made! It helps inspire others to cook new and interesting dishes.
If you want more Magimix, Optimum or Thermomix recipe ideas or information, please follow the ThermoKitchen FB Page. I post everything I know here first!
GET INSPIRED;
No-Bake Chocolate Cheesecake
Ingredients
Cheesecake Base
- 200 g chocolate ripple biscuits Arnotts brand
- 80 g butter
- ½ teaspoon cinnamon
Cheesecake Filling
- 10 g unflavoured gelatin
- 70 g hot tap water
- 150 g dark chocolate 45% cocoa melted
- 500 g cream cheese
- 395 g condensed milk
- 50 gm chocolate ripple biscuits Arnotts brand
Topping
- 50 g dark chocolate 45% cocoa melted
- 1 pkt candy mini eggs
- 1 pkt caramel filled mini eggs
Instructions
Cheesecake Base
- Line an 8 or 9" springform cake tin with baking paper.
- Place the cubed butter in TM Bowl. Melt 2min/Varoma/Speed 3.80 g butter
- Add 200gm chocolate biscuits and cinnamon to the butter. Blitz 5 sec/Speed 8.200 g chocolate ripple biscuits, ½ teaspoon cinnamon
- Scrape down the bowl and blitz again. 5 sec/Speed 5.
- Add the biscuit crumb to the prepared tin and press into position firmly with a flat glass. Refrigerate.
Cheesecake Filling
- Sprinkle gelatin over the water in a small microwave-safe bowl. Use a spoon to get out any lumps.10 g unflavoured gelatin, 70 g hot tap water
- Microwave the gelatin mixture for 30 seconds and then ensure that the mixture is well combined and lump free.
- Place the chocolate squares in a small microwave-safe bowl. Microwave at 30-second intervals stirring in between. Continue until the chocolate is fully melted.150 g dark chocolate
- Without cleaning the TM bowl add the cream cheese and condensed milk to the TM. Combine 30 sec/Speed 4.500 g cream cheese, 395 g condensed milk
- Scrape down the bowl, add the melted chocolate and gelatin. Combine 30 sec/Speed 4.
- Scrape down the bowl, add the remaining 50g of chocolate ripple biscuits. Blitz 5 sec/Speed 7.50 gm chocolate ripple biscuits
- Pour the cheesecake filling into the base and refrigerate for at least 6 hours.
Topping
- Melt the remaining 50g chocolate in the microwave.50 g dark chocolate
- Use a spoon to scoop out the chocolate and draw zigzag lines on the cheesecake.
- Decorate with Easter Eggs and serve.1 pkt candy mini eggs, 1 pkt caramel filled mini eggs
Notes
Log in: Then add your own recipe notes below!
Nutrition
I hope you have enjoyed this story. Feel free to leave a comment or start a discussion. If you have made a dish from this site, I would love to know what you thought!
Leaving a comment and a star rating helps others decide if they should try my recipe. Plus, if you hit the social media share buttons, your friends may find a delicious new recipe or Thermomix Tip too!
If you want to be notified when a new recipe is released, sign up for my monthly newsletter. The form is also in the footer!
Thank you for stopping by,
Happy Cooking
j xx

Link Disclosure
From time to time, I recommend kitchen products and ingredients. These are always items I use and love! When I share a link to a product, you can rest assured that I have tested the item and genuinely love it! If you follow my link and purchase the item, in some cases, I will receive a commission for the referral.
While the commission may only be $1 or so, I value your support, and I take your trust very seriously.
By clicking on my link or selecting me as the referrer, "Julie Carlyle," you reward me with a small commission that helps support me and this website.
Your support keeps me cooking!


Melinda C says
This is such a fabulous recipe and so easy! the kids loved the little eggs on top too. Melinda
Julie Carlyle says
Hi Melinda
Thank you so much, I love this recipe too! so easy!!
jxx