
Estimated reading time: 7 minutes
Easter Bunny Cinnamon Scrolls are officially the cutest thing I have ever made for Easter. That is a big call because I have been oversharing my food adventures with the internet since 2009! Better yet, these gorgeous creatures are not only great to look at but absolutely delectable also!

Key Takeaways
- Easter Bunny Cinnamon Scrolls are cute and delicious, made with enriched dough for a soft texture.
- Enriched dough gives a melt-in-the-mouth quality, while regular dough works better for structured recipes like pizza.
- Tips for making the scrolls include flouring hands, avoiding over-handling, and letting the dough proof longer.
- You can store scrolls in an airtight container, freeze them, or enjoy them warm after microwaving.
- This recipe is inspired by That Bread Lady and includes links to other Easter recipes.
Table of contents
What Makes Cinnamon Scrolls Soft & Delicious?
Unlike regular bread dough, a good scroll is made with an enriched dough. This removes some of the "bready" characteristics and gives the finished product a soft, melt-in-the-mouth texture with the gluten structure to hold substantial toppings like bread dough but the beautiful mouthfeel and richness of a buttery cake.
So now that I have geeked out on dough with you, here is a comparison between where I have used a simple bread dough, and where an enriched dough was a better choice.
Enriched Bread Dough V's Regular Bread Dough
As I mentioned some recipes, like these bunny cinnamon scrolls are just magic with an enriched dough. Recipes like my Thermomix pizza dough need more structure and crispiness, so a regular dough is ideal.
Enriched Bread Dough
- Thermomix Cinnamon Scrolls with Cream Cheese Glaze
- Thermomix Apple & Walnut Scrolls Bakers Delight
- Brioche Buns
- Bunny Cinnamon Scrolls
Regular Dough
- Thermomix Pizza Dough
- Easy Thermomix Bread
- Thermomix Bread Rolls
- Thermomix No-Fail Bread
- Vegemite Scrolls
Oh, and...
If you're preparing homemade bread you really should try making your own Homemade Spreadable Butter!

Thermomix Bunny Cinnamon Scroll Tips
Turn the TM bowl upside down and remove the blades to make removing the dough easier.
The dough will be stickier than usual, flour your hands lightly and push it together into a ball.
Leave the dough covered and in a warm place to proof. Because it is heavier and richer, it will take longer to proof than regular dough.
Try to avoid over-handling the dough once it has been proofed.
Leave a 2 cm clear section of dough down the rectangles left free from cinnamon and butter.
Roll the bunny's body by starting with the cinnamon middle and ending at the clear dough segment on the left.
Don't do a second proof once the bunnies have been formed.
Let's Connect!
I share loads of great recipes on the website, but those who find out first are my special newsletter friends. You can even choose your favourite topics!
I also have a lively social community. Take a look at the Facebook Group page. It is a fabulous place to ask questions, join the chatter, and share images of recipes you have made! It helps inspire others to cook new and interesting dishes.
If you want more Magimix, Optimum or Thermomix recipe ideas or information, please follow the ThermoKitchen FB Page. I post everything I know here first!
GET INSPIRED;

Step By Step Cinnamon Scroll Easter Bunnies
Making the Cinnamon scroll dough is very simple in the Thermomix. If you have trouble getting the dough to proof and double in size read my proofing tips related to proofing in colder weather.

FAQ Thermomix Cinnamon Scroll Bunnys
If you want to trace a defined line, wait until the bunnies are cold or it will melt and spread. If you prefer an all-over glaze you can ice when warm.
Don't worry about any malformed animals. The icing makes the bunny shape. You can fix the look of the bunny by icing it as you hoped it had baked.
If the scrolls have cream cheese icing, store them in an airtight container in the fridge. If they have a regular icing sugar and water glaze store them at room temperature.
Yes, Cinnamon scrolls can be frozen and thawed prior to eating. Heat in the microwave to serve.
The scrolls will keep up to a week refrigerated. They are best served warm, so don't forget to microwave for about 15- 20 seconds.
This recipe has been inspired and adapted from That Bread Lady. Heather has a slightly different recipe for her scrolls and the icing is an allover glaze. But her instructions for making bunnies are so easy to follow.
Other Thermomix Easter Recipes
If you feel like doing a little cooking over the Easter bread I have some fabulous recipes for you to try.
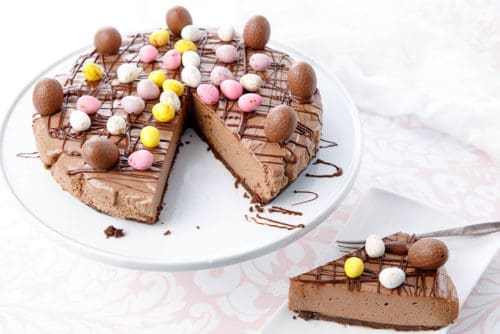
Thermomix Easter Chocolate Cheesecake makes a fabulous centerpiece for an Easter celebration
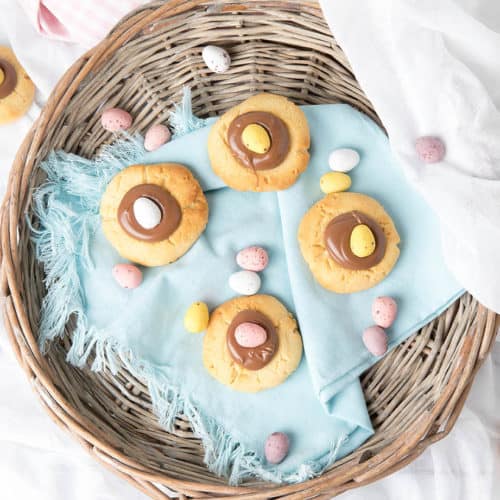
Easter Chocolate Thumbprint Cookies are a great way to finish leftover Easter chocolate and have snacks ready for school lunchboxes.

Easter Hot Cross Buns. I know they are in all the stores but until you make your own you can't imagine what you are missing. These are delicious, soft, warm, and fresh. Not squashed in the trolley and sad.

Thermomix Cinnamon Scroll Bunnys
Equipment
Ingredients
Scroll Dough
- 120 g warm water ½ cup (US cups not metric cups)
- 7 g dry yeast 2 ¼ teaspoon
- 65 g caster sugar ⅓ cup superfine sugar (US cups, not metric cups)
- 120 g warm milk ½ cup (US cups, not metric cups)
- 90 g butter cubed salted butter at room temperature
- 1 teaspoon vanilla paste
- 570 g bakers flour 5 cups (US cups, not metric cups)
- 2 eggs
- 1 teaspoon salt
Scroll Filling
- 60 g butter salted and melted in the microwave
- 75 g caster sugar ⅓ cup superfine sugar (US cups, not metric cups)
- 75 g brown sugar ⅓ cup (US cups, not metric cups)
- 3 TBS ground cinnamon
Cream Cheese Frosting
- 112 g cream cheese 4 oz
- 60 g salted butter ¼ cup
- 1 teaspoon vanilla extract
- 180 g icing sugar 1 1/12 cups (US cups, not metric)
Instructions
Dough
- Place milk, water yeast, and sugar in the TM Bowl. Heat 5 min/37 degrees/Speed 3.120 g warm water, 7 g dry yeast, 65 g caster sugar, 120 g warm milk
- Add eggs, vanilla, butter, flour then salt in the bowl. Knead 1 minute.90 g butter, 1 teaspoon vanilla paste, 570 g bakers flour, 2 eggs, 1 teaspoon salt
- Oil your hands and a bowl.
- Remove the dough from the TM bowl and shape it into a ball. Place the dough into a glass bowl in a warm environment. (see notes on proofing)
- Once the dough has doubled in size remove it from the bowl and place it on an oiled bench.
- Roll the dough until it measures 40cm x 35 cm or 18" x 12".
Cinnamon Filling
- Melt the butter in the microwave and reserve.60 g butter
- In a separate bowl combine brown sugar, white sugar, and cinnamon.75 g caster sugar, 75 g brown sugar, 3 TBS ground cinnamon
- Use a pastry brush to brush the butter over the dough. Return to all sections of the dough until all the butter has been used. It may look like too much butter but for the bunnies to be delicious you will need it all.
- Now mark a 1 ½ cm line down the side left-hand side of the dough. This area will be cinnamon-free.
- Sprinkle the cinnamon and sugar over the dough. Return to all sections of the dough except the marked-off area until there is no filling left. Ensure the filling is evenly spread over the dough.
Making The Bunnies
- Place a piece of baking paper on a large baking tray.
- Heat the oven to 180 degrees Celcius.
- Measure the dough covered in cinnamon, about 38cm. Mark the halfway point, along the width. 19cm. Cut the dough in half here. One side will be larger as it has a cinnamon-free section. This is the face of the bunny.
- Now measure halfway down the length of the dough. Mark the dough at the 17cm point, or wherever is halfway on your dough. Cut the dough in half here.You should have four quarters.
- Continue to cut each section lengthwise so there are 8 strips, one for each bunny.
- Starting from the centre roll from the middle to the left, then tuck the dough under so it lays flat under the face on the baking tray.
- Continue to do the remaining 7 bunnies the same way.
- The other dough is for the ears.
- Fold the dough strip in half so the cinnamon is on the inside.
- Then make an M shape. Bring the two ends together in a heart.
- Lift the edge of the bunny circles faces up and tuck the V of the heart under so the bunny now has ears.
- Continue until all the bunnies have ears.
- Place the Cinnamon Scroll Bunnies in the oven for 18-22 minutes or until cooked.
- Once cooked allow them to cool before icing.
Icing Bunnies
- Place all the ingredients in the TM Bowl. Combine 10 sec /Speed 4.112 g cream cheese, 60 g salted butter, 1 teaspoon vanilla extract, 180 g icing sugar
- Scrape down the bowl and repeat. 5 sec/Speed 4
- Optionally add a drop of pink food colouring and mix 5 sec/Speed 4.
- Place the icing into a piping bag. If the icing isn't stiff enough to hold form place it in the fridge to chill.
- Pipe around the bunnies to highlight the ears and to make a swirl on the face.It's easier to start at the inside of the face and work your way out.
Notes
Log in: Then add your own recipe notes below!
Nutrition
I hope you have enjoyed this story. Feel free to leave a comment or start a discussion. If you have made a dish from this site, I would love to know what you thought!
Leaving a comment and a star rating helps others decide if they should try my recipe. Plus, if you hit the social media share buttons, your friends may find a delicious new recipe or Thermomix Tip too!
If you want to be notified when a new recipe is released, sign up for my monthly newsletter. The form is also in the footer!
Thank you for stopping by,
Happy Cooking
j xx

Link Disclosure
From time to time, I recommend kitchen products and ingredients. These are always items I use and love! When I share a link to a product, you can rest assured that I have tested the item and genuinely love it! If you follow my link and purchase the item, in some cases, I will receive a commission for the referral.
While the commission may only be $1 or so, I value your support, and I take your trust very seriously.
By clicking on my link or selecting me as the referrer, "Julie Carlyle," you reward me with a small commission that helps support me and this website.
Your support keeps me cooking!


Leave a Reply