
Estimated reading time: 4 minutes
How do keep you Kombucha warm in winter when the kitchen temperature falls? Here are some useful tips to keep your Kombucha warm & healthy all through winter.
Please note there may be affiliate links in this post. For more information see my disclosure page or the bottom of this article.
The ideal temperature to ferment Kombucha is 24 - 30 degrees Celsius or 75-85 degrees Fahrenheit. In this environment, Kombucha will usually take between 7-10 days to brew.
When a living organism is growing in less than ideal conditions it becomes weakened and is more susceptible to disease and death. Your SCOBY and kombucha brew is a living organism and needs to be kept within its "temperature comfort zone".
Signs your kombucha is too cold
Slow Fermentation
The first thing you will notice as the temperature drops is that your kombucha brew is taking longer to ferment. Each cycle may take a few days longer to brew. Eventually, it will seem as though the brew is just never going to ferment. When this happens the symbiotic relationship between the bacteria and yeast has stalled. The acidic nature of the Kombucha is slow to be produced which can lead to the next problem.
Mould Growth
The acidic levels of the Kombucha keep mould from forming in your brew. When the Kombucha is under stress and the fermentation is slow or stalled it is more likely to develop mould.
How do you know if your Kombucha is Warm?
We've established that Kombucha loves warm weather, a bit like me really, 24-30 degrees is also my ideal temperature. Unfortunately, my home drops to between 15-20 degrees throughout winter.
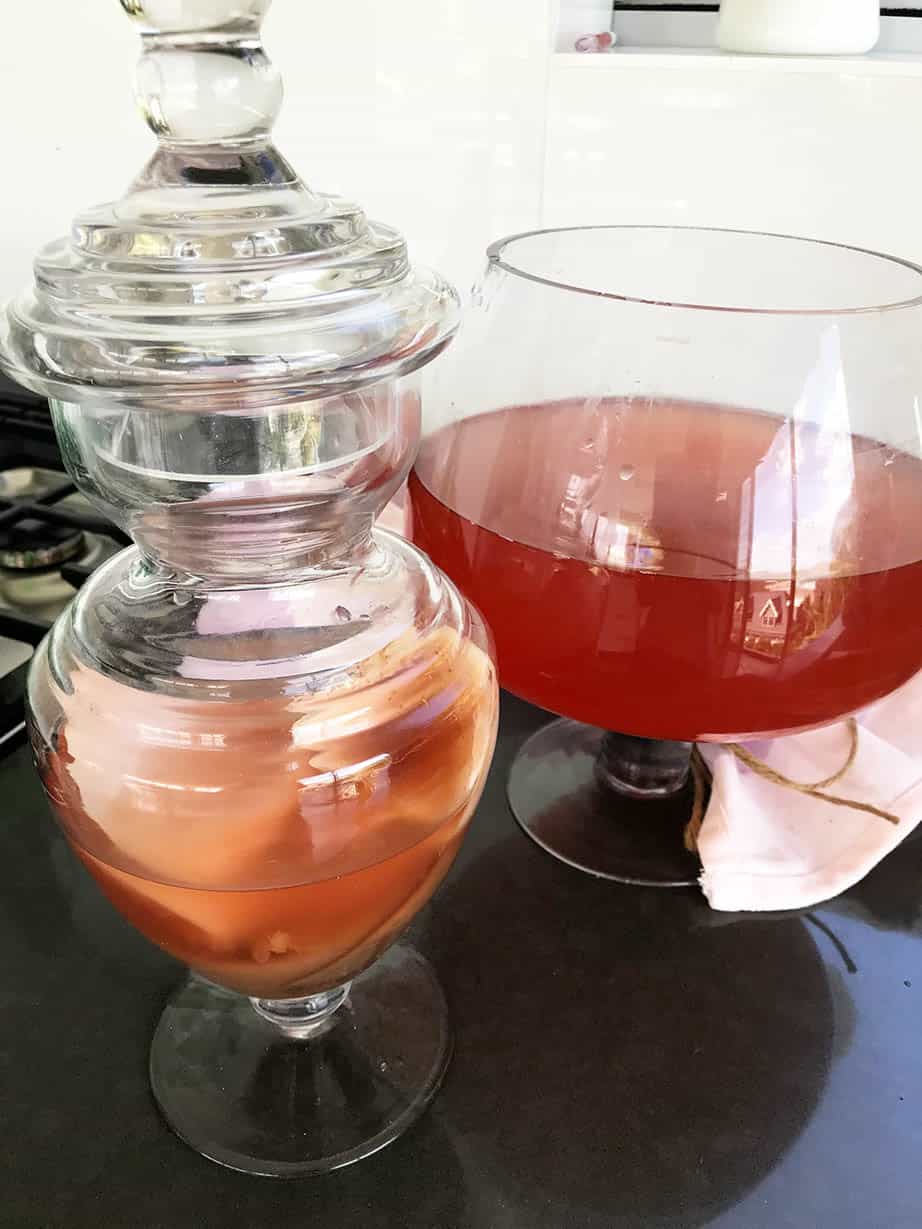
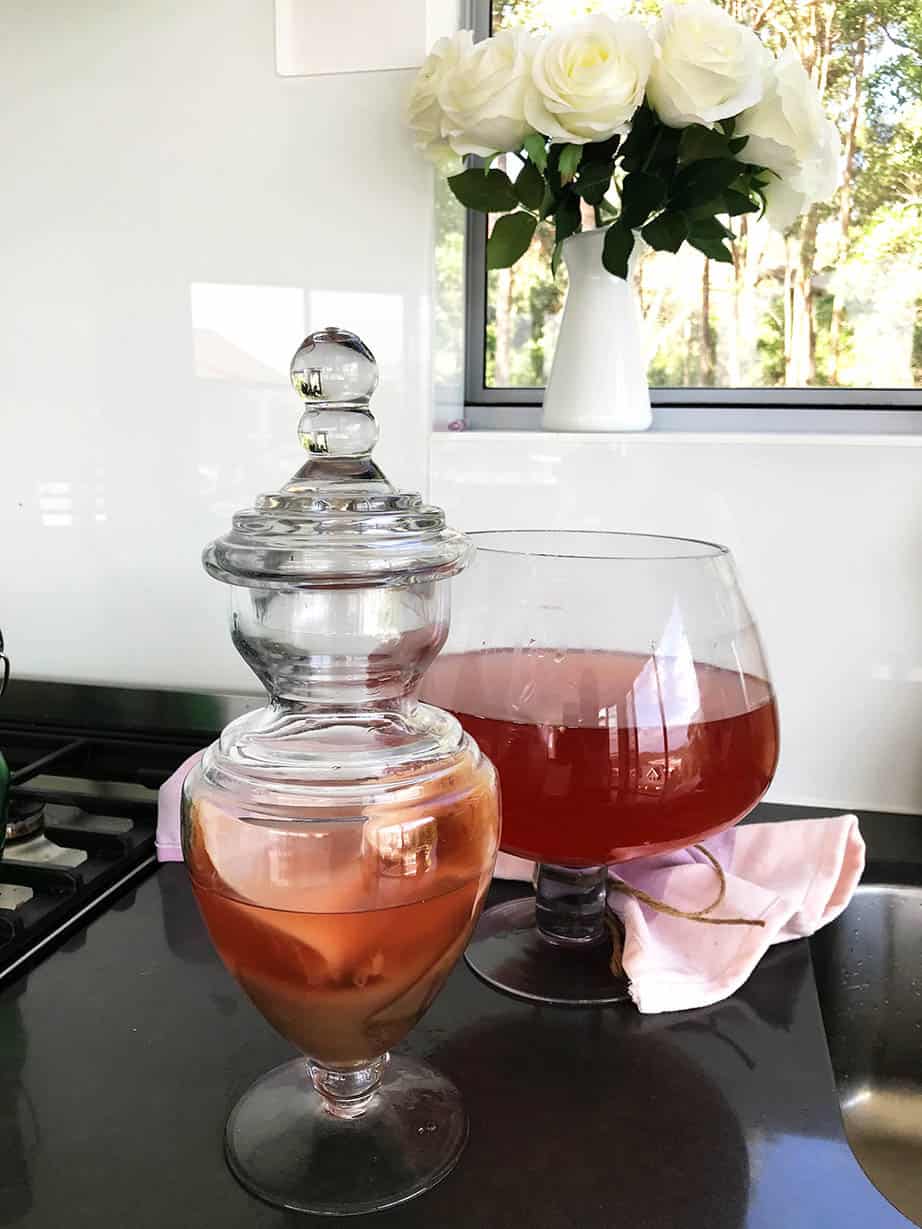
I know how cold it gets in my kitchen because when my booch was taking FOREVER to brew, I bought a strip thermometer to stick on the kombucha vessel. The thermometer is indispensable! It allows me to evaluate and monitor different heating methods. The thermometer is also useful in summer as my kitchen can get quite hot!
During the first winter, I tried many different ways to warm my Booch. I had success with the methods listed below until the very coldest of months. Once we were in the depths of winter I needed to "bite the bullet" and purchase a cheap heating mat. This winter, at the first sign of a slow kombucha yield I put the booch on its little warming mat.
If your house doesn't get as cold as mine you may find these tips are enough to keep your Kombucha happy all through winter.
Tips For Keeping Kombucha Warm in Winter
- Sit the Kombucha on a warm appliance.
- Relocate the brewing vessel to a warmer room in the house.
- Place the kombucha in a high cupboard, these tend to be warmer as heat rises.
- Wrap the brewing vessel in a towel and place in the high cupboard.
- Wrap the brewing vessel in a towel and place in the high cupboard and add a hot water bottle.
What to do when it's still too cold to brew
- Use a homebrew heating pad to keep it warm. These maintain a constant temperature depending on the size of the vessel. If the vessel is smaller than the recommended size you will need to elevate it off the pad slightly with egg rings. This is the one I use! It's also the cheapest on the market at $39.
- Use a heating pad with a thermostat so it can set the pad to the desired temperature.
- Seedling propagation mat, again you will need to monitor the actual temperate of the brew when you first start using the mat.
- Kombucha heating strip by Kombucha Kamp is a specific product made for Kombucha brewers. I haven't used it but it looks good
- Check out homebrew supplies for other fermentation aids. I haven't used a heating belt but this may also work for Kombucha.
I hope this article has helped you and you are able to continue to enjoying Kombucha throughout winter. If you're interested in more Kombucha articles take a look at these:
Adding Flavours to your Kombucha - F2
How to make Kombucha from scratch
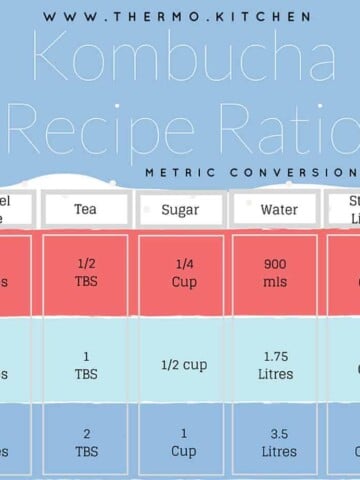
Kombucha Recipe Chart Australian & US Measurements

If you have any other heating methods please feel free to leave your ideas in the comments section below or join us on our FB page for more discussions.
Would you like to know more? Check out my Kombucha Brewing eBook!

Link Disclosure
From time to time I recommend kitchen products and ingredients. These are always items I use and love! When I share a link to a product you can rest assured that I have tested the item and genuinely love it! If you follow my link and purchase the item in some cases I will receive a commission for the referral.
Whilst the commission may only be $1 or so, I value your support, and I take your trust very seriously.
By clicking on my link, or selecting my name "Julie Carlyle" as the referer you reward me with a small commission that helps support me and this website.
Your support keeps me cooking!
Ainsley Saffell says
I’ve got a heating pad on the lowest setting under my kombucha. also, I heat two buckwheat bags (normally use as foot warmers) in my Microwave oven and prop them against the sides of the kombucha jar.
Lisa Fuchs says
Thank u for this article. I’ve been thinking about putting my kombucha in my oven, hoping the pilot light will keep it warm.
Ben says
Everything I have read suggest heating from the sides rather than the bottom. This benefits the bacteria which congregate towards the top & avoids over-activating the yeast which tends to settle to the bottom. Have you had any issues heating from the bottom or perhaps you raise the vessel above the heating pad to avoid direct heating? If so how far do you raise it? Or perhaps you place the mat on its side next to the brewing vessel?
I’m thinking maybe I’m better off with a seedling mat which wraps around the vessel rather than a heating pad on the bottom, but in the meantime I’m going to try a hot water bottle wrapped in a towel and placed closely next to the vessel.
Thanks
Julie Carlyle says
Hi Ben< I have had absolutely no problems with using heat from below.Heating from below creates convections currents on the brewing vessel so the heat circulates evenly naturally 🙂